Plate layouts
Description
Plate layouts are used to describe the plate organization in terms of well types, doses, replicates, experimental conditions, etc.
Storing this information in the form of layouts allows reuse in different applications and workflows without needing to redefine the information each time.
Layout Type
There are several types of plate layouts, each describing a different property of the plate. Not all layout types are available in all applications. Also, each type of layout expects a different type of data.
| Layout type name | Availability in other apps | Behavior | Expected data |
|---|---|---|---|
| Control layout | Assay and Sample | Defines the global content of the plate | Well type |
| Dose layout | Assay | Defines dose applied on reference wells | Positive real value and unit |
| Replicate layout | Assay | Defines replicates on each well | Positive natural value |
| Experimental Condition layout | Assay | Defines relevant scientific information of your experiment | Free text |
| Filling layout | Sample | Defines the filling order of a plate | Positive natural value |
| Dilution Factor layout | Sample | Defines the dilution factor used in serial dilution workflows (Sample) | Positive real value |
Layout Status
A publication system is used for layouts.
- First, you are able to design your layouts in
Draftmode. These layouts are not available in other applications until they are published. - Once published, they are available to other applications, and it is not possible to edit them anymore.
- You can retire them in order to disable their selection in other applications.
graph LR;

DRAFT[Draft]
PUBLISH[Published]
HIDDEN[Retired]

subgraph Editable
   DRAFT
end

subgraph Available
   PUBLISH
end

DRAFT --> PUBLISH
HIDDEN --> PUBLISH
PUBLISH --> HIDDEN
Layout List
To view all well types, click on Labware items > Plate Layouts in the left navigation panel.

Create a New Layout
To create a new layout, click the New Layout button.
A modal window opens, allowing you to fill in the layout information:
- Name: The display name for the layout.
- Type: The type of the layout.
- Size: The size of the plate, which is defined by an object format.
- Description: An optional description for the layout.
For experimental condition layouts, you will also need to enter the data type (number, text, or vocabulary). The vocabulary data type is used to select a list of vocabulary which can be used when creating your layout content.

Once done, click the Create button.
The plate layout is created in Draft mode. You can now fill in the content of your layout. See Edit the layout content section for more information about how to fill in the layout content.
Warning
Each layout must have a unique combination of size, type, and name. This means that two layouts with the same size and type cannot share the same name.
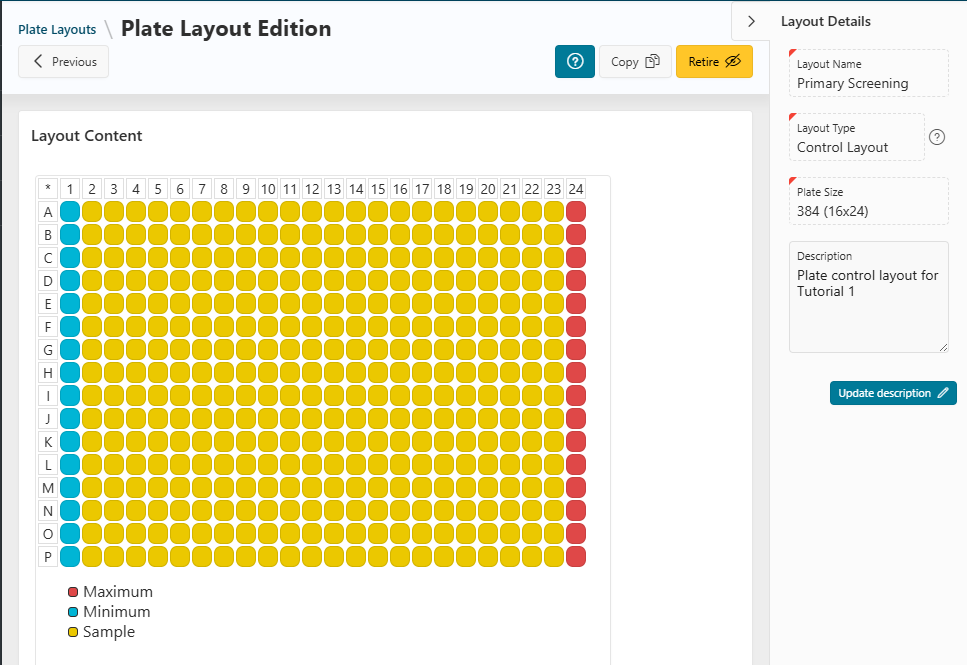
See the details of a layout
From the layout list, click on the name of the layout to see its details. You will reach the plate layout details page.
On this page, in the right collapsible column, you can see the general information about the layout such as name, type, size, and description. In the middle, you can see the content of the layout and edit it if it is not yet published.
Edit an existing plate layout
Info
Only Draft layouts can be edited.
From the plate layout editing page, you can perform several actions in order to design your layout.
Edit the layout information
While editing a draft, you can change all the layout information using the right panel. Once you have finished, click on the Save Draft button.
Info
You can change the description of the layout even if it is published or retired.
Edit the layout content
To edit the layout content, select some wells in the plate viewer.
- Fill in the fields above and then click on the
Applybutton. - Once done, changes appear but are not saved.
- Click the
Save Draftbutton to save your modifications. Clear Wellwill erase the content of the selected wells.Clear Layoutwill erase the content of the entire layout.
Once you have finished, click on the Save Draft button.
Advanced filling (Dose layout only)
The Advanced filling button allows you to access all the advanced fields.
With the advanced mode, you are able to set doses using a starting dose and a dilution factor in selected wells, taking into account the number of replicates. As you can select one or more subsets of wells, you have to choose the filling mode (by row or by column) and where the well containing the starting dose will be.
Example
Here, the starting value (100 µM) will be in A1 and A2 (starting maximum value: top right of the selection). It will be replicated in all wells in columns 1 and 2 (number of replicates: 2 and filling mode: by row), then the starting dose will be divided by 2 (dilution factor to apply: 2) and will be set to the wells B1 and B2, and so on. After clicking on the Apply button, your layout is filled.

Publish, retire, unretire a layout
Once your layout is ready, you can publish it to make it available in other applications.
- To publish a layout, click the
Save and Publishbutton at the top right of the page.
If you no longer need a layout, you can retire it. Retiring a layout makes it unavailable in other applications, but it can still be edited in the current application.
- To retire a layout, click the
Retirebutton at the top right of the page. - If you want your layout to be available again, you can unretire it by clicking the
Unretirebutton at the top right of the page.
Copy a layout
Click on the Copy button at the top right of the page to create a copy of the current layout.
- You will be prompted to fill in the name of the new layout.
- Click the
Create Copybutton to create the copy.
You will reach the editing page of the new layout, where all the information will be copied.
Delete layout
Click on the Delete Layout button to delete a layout. This action cannot be canceled.
Info
You can only delete a layout that is in Draft mode.